Microsoft Defender for Endpoint
Microsoft Defender for Endpoint is an enterprise endpoint security platform designed to help enterprise networks prevent, detect, investigate, and respond to advanced threats.
Overview
The recommended approach to provision access to Microsoft Defender XDR is through Azure Identity Governance using Access Packages. Using Identity Governance Access Packages enables Cyderes to easily and securely access client's Defender XDR environments using Cyderes SSO credentials. This approach enables:
- Automated access life cycle management
- Access review compliance
- least privilege security rights assignment.
For more info on this approach for Defender XDR specifically, see the Microsoft blog post here: at Multi-tenant access for MSSP
Prerequisites
Admin Access Required
Implementation of Azure Identity Governance, setup of the Identity Governance Access Packages, and setup of permissions within Defender for Endpoint or Defender XDR depending on the permission model being used requires Global Administrator OR Security Administrator + Identity Governance Administrator roles. Azure Identity Governance itself requires Entra ID P2 licensing.
Defender for Endpoint RBAC Enablement Caution
Initially, only those with Entra ID Global Administrator or Security Administrator rights will be able to create and assign roles in Microsoft Defender for Endpoint, therefore, having the right groups ready in Entra ID is important. Turning on role-based access control will cause users with read-only permissions (for example, users assigned to Entra ID Security reader role) to lose access until they are assigned to a role. Users with admin permissions are automatically assigned the default built-in Microsoft Defender ATP global administrator role with full permissions. After opting in to use RBAC, you can assign additional users that are not Entra ID Global or Security Administrators to the Microsoft Defender for Endpoint global administrator role. After opting in to use RBAC, you cannot revert to the initial roles as when you first logged into the portal.
Procedure - Access Packages
Note: A 3-step process is required for provisioning Defender access for Cyderes MSS Analysts (Tier1, Tier2 and Tier3).
- Log on to Azure portal.azure.com with a user that has the Global Administrator or Identity Governance Administrator role.
- Navigate to Entra ID | Groups
-
Create 4 Security groups named:
- Cyderes MSS Tier1
- Cyderes MSS Tier2
- Cyderes MSS Tier3
- Cyderes MSS MSSP Analyst Approvers
Note: These groups will be linked to the Roles you create in MDE. -
Log back on to Azure (portal.azure.com) with the user that has Global Administrator role.
- Navigate to Azure Active Directory | Identity Governance | Connected Organizations
- Click Add connected organization
- In name type
Cyderes - In description type
Cyderes Entra ID Tenant - In State select Configured
- Click Next: Directory + Domain
- Click Add directory + domain
- In the search field type
cyderes.com - Click Add
- Click Select
- Click Next: Sponsors
- Click Next: Review + Create
- Click Create
- In name type
- To the newly created group
Cyderes MSS MSSP Analyst Approversadd the following Cyderes resources:- The CSM for your account and any deputy.
- The SOC leadership for your assigned SOC Squad. These specific people are provided during onboarding.
- Navigate to Entra ID | Identity Governance | Access Packages
- Click + New access package
- In Name type
Cyderes MSS Tier1 - In Description type
Cyderes MSS Tier1 Defender XDR Users - Leave Catalog as
General - Click Next: Resource roles
- Click + Groups and Teams
- Select See all Groups and Teams…
- Select
Cyderes MSS Tier1and click Select - Select
Rolefrom the drop down of Member - Click Next: Request
- Select
For users not in your directory - Select
Specific connected organisations- Click + Add Directories
- Select
Cyderesand click Select
- Select
Yesfor Require Approval - Decide if justification is required or not
- Select
1,2or3for How many stages (This will determine how many members of theCyderes MSS MSSP Analyst Approversneed to approve a new user’s membership of this Security Group) - In First Approver select
External Sponsor- Click + Add fallback
- Select
Cyderes MSS MSSP Analyst Approversand click Select - Click Enable new requests
- Click Next: Requestor Information
- Click Next: Lifecycle
- In Expiration set the assignment expiration to
Never - Choose if Access reviews are desired and configure as desired
- Click Next: Rules
- Click Next: Review + Create
- Click Create
- In Name type
- Copy the
My Access portal linkand provide to Cyderes - Navigate to Azure Active Directory | Identity Governance | Access Packages
- Click + New access package
- In Name type
Cyderes MSS Tier2 - In Description type
Cyderes MSS Tier2 Defender XDR Users - Leave Catalog as
General - Click Next: Resource roles
- Click + Groups and Teams
- Select
See all Groups and Teams… - Select
Cyderes MSS Tier2and click Select - Select
Rolefrom the drop down of Member - Click Next: Request
- Select
For users not in your directory - Select
Specific connected organisations- Click + Add Directories
- Select
Cyderesand click Select
- Select
Yesfor Require Approval - Decide if justification is required or not
- Select
1,2or3for How many stages (This will determine how many members of theCyderes MSS MSSP Analyst Approversneed to approve a new user’s membership of this Security Group) - In First Approver select
External Sponsor- Click + Add fallback
- Select
Cyderes MSS MSSP Analyst Approversand click Select - Click Enable new requests
- Click Next: Requestor Information
- Click Next: Lifecycle
- For Expiration, set the assignment expiration to
Never - Choose if Access reviews are desired and configure as desired.
- Click Next: Rules
- Click Next: Review + Create
- Click Create
- In Name type
- Copy the
My Access portallink and provide to Cyderes. - Navigate to Azure Active Directory | Identity Governance | Access Packages
- Click + New access package
- In Name type
Cyderes MSS Tier3 - In Description type
Cyderes MSS Tier3 Defender XDR Users - Leave Catalog as
General - Click Next: Resource roles
- Click + Groups and Teams
- Select
See all Groups and Teams… - Select
Cyderes MSS Tier3and click Select - Select
Rolefrom the drop down of Member - Click Next: Request
- Select
For users not in your directory - Select
Specific connected organisations- Click + Add Directories
- Select
Cyderesand click Select
- Select
Yesfor Require Approval - Decide if justification is required or not
- Select
1,2or3for How many stages (This will determine how many members of theCyderes MSS MSSP Analyst Approversneed to approve a new user’s membership of this Security Group) - In First Approver select
External Sponsor- Click + Add fallback
- Select
Cyderes MSS MSSP Analyst Approversand click Select - Click Enable new requests
- Click Next: Requestor Information
- Click Next: Lifecycle
- In expiration set the assignment expiration to
Never - Choose if Access reviews are desired and configure as desired.
- Click Next: Rules
- Click Next: Review + Create
- Click Create
- In Name type
- Copy the
My Access portal linkand provide to Cyderes.
Role Based Access Control (RBAC) for Defender for Endpoint
Cyderes recommends using Defender XDR's Unified RBAC permissions where possible. See Microsoft's documentation for more info: Microsoft Defender XDR Unified role-based access control (RBAC)
To validate which permission model is in use, navigate to Permissions and Roles in Defender XDR > Settings > Microsoft Defender XDR > Permissions and Roles. If the "Endpoint & Vulnerability Management" workload is active, use the "Unified RBAC Permission Model" instructions below. If that workload is not active, use the "MDE Role Permission Model" instructions instead.
Unified RBAC Permission Model
Tier 1 (Unified RBAC)
- Log on to Defender XDR (security.microsoft.com) with the Global Administrator or Security Administrator role.
- Navigate to Microsoft Defender XDR roles in Permissions > Microsoft Defender XDR > Roles
- Click + Create Custom Role
- Role Name:
Cyderes MSS Tier1 - Click Next
- Select the "Security Operations" permission group and select:
- Security data basics
- Alerts (manage)
- Response (manage)
- Click Apply
- Select the "Security Posture" permission group and select:
- All read-only permissions
- Click Apply
- Click Next
- Click + Add Assignment
- Assignment Name:
Cyderes MSS Tier1 - Assign users and groups: Select the
Cyderes MSS Tier1group - Data sources: Select all data sources and select the checkbox for "Include future data sources automatically".
- Click Add
- Click Next
- Click Submit
Tier 2 (Unified RBAC)
- Log on to Defender XDR (security.microsoft.com) with the Global Administrator or Security Administrator role.
- Navigate to Microsoft Defender XDR roles in Permissions > Microsoft Defender XDR > Roles
- Click + Create Custom Role
- Role Name:
Cyderes MSS Tier2 - Click Next
- Select the "Security Operations" permission group and select:
- Security data > Security data basics (read)
- Security data > Alerts (manage)
- Security data > Response (manage)
- Security data > Basic Live Response (manage)
- Security data > File collection (manage)
- Click Apply
- Select the "Security Posture" permission group and select:
- All read-only permissions
- Click Apply
- Click Next
- Click + Add Assignment
- Assignment Name:
Cyderes MSS Tier2 - Assign users and groups: Select the
Cyderes MSS Tier2group - Data sources: Select all data sources and select the checkbox for "Include future data sources automatically".
- Click Add
- Click Next
- Click Submit
Tier 3 (Unified RBAC)
- Log on to Defender XDR (security.microsoft.com) with the Global Administrator or Security Administrator role.
- Navigate to Microsoft Defender XDR roles in Permissions > Microsoft Defender XDR > Roles
- Click + Create Custom Role
- Role Name:
Cyderes MSS Tier3 - Click Next
- Select the "Security Operations" permission group and select:
- Security data > Security data basics (read)
- Security data > Alerts (manage)
- Security data > Response (manage)
- Security data > Basic Live Response (manage)
- Security data > File collection (manage)
- Click Apply
- Select the "Security Posture" permission group and select:
- All read and manage permissions
- Select the "Authorization and settings" permission group and select:
- Authorization > Read and manage
- Security Settings > Detection tuning (manage)
- Security Settings > Core security settings (read)
- Security Settings > Core security settings (manage)
- Click Apply
- Click Next
- Click + Add Assignment
- Assignment Name:
Cyderes MSS Tier3 - Assign users and groups: Select the
Cyderes MSS Tier3group - Data sources: Select all data sources and select the checkbox for "Include future data sources automatically".
- Click Add
- Click Next
- Click Submit
MDE Role Permission Model
Tier 1 (Role Permission)
- Log on to Defender XDR (security.microsoft.com) with the Global Administrator or Security Administrator role.
- Navigate to Settings | Endpoints | Roles
- Click + Add item
- In Role name type
Cyderes MSS Tier1 - Select the following permissions:
- View Data
- Security operations
- Defender Vulnerability management
- Active remediation actions
- Security operations
- Alerts investigation
- View Data
- Click Next
- Select
Cyderes MSSTier1then click Add selected groups - If you have created device groups in Defender for Endpoint to limit visibility of system to specific teams please ensure that
Cyderes MSS Tier1are assigned users in these groups. Please see this article for further information https://learn.microsoft.com/en-us/microsoft-365/security/defender-endpoint/machine-groups?view=o365-worldwide - Click Save
Tier 2 (Role Permission)
- Log on to Defender XDR (security.microsoft.com) with the Global Administrator or Security Administrator role.
- Navigate to Settings | Endpoints | Roles
- Click + Add item
- In Role name type
Cyderes MSS Tier2 - Select the following permissions:
- View Data
- Security operations
- Defender Vulnerability management
- Active remediation actions
- Security operations
- Threat and vulnerability management - Exception handling
- Threat and vulnerability management - Remediation handling
- Threat and vulnerability management - Application handling
- Threat and vulnerability management - Manage security baselines assessment profiles
- Alerts investigation
- Manage security settings in Security Center
- Live response capabilities
- Advanced
- View Data
- Click Next
- Select
Cyderes MSSTier2then click Add selected groups - If you have created device groups in Defender for Endpoint to limit visibility of system to specific teams please ensure that
Cyderes MSS Tier2are assigned users in these groups. Please see this article for further information https://learn.microsoft.com/en-us/microsoft-365/security/defender-endpoint/machine-groups?view=o365-worldwide - Click Save
Tier 3 (Role Permission)
- Log on to Defender XDR (security.microsoft.com) with the Global Administrator or Security Administrator role.
- Navigate to Settings | Endpoints | Roles
- Click + Add item
- In Role name type
Cyderes MSS Tier3 - Select the following permissions:
- View Data
- Security operations
- Defender Vulnerability management
- Active remediation actions
- Security operations
- Threat and vulnerability management - Exception handling
- Threat and vulnerability management - Remediation handling
- Threat and vulnerability management - Application handling
- Threat and vulnerability management - Manage security baselines assessment profiles
- Alerts investigation
- Manage security settings in Security Center
- Live response capabilities
- Advanced
- View Data
- Click Next
- Select
Cyderes MSS Tier3then click Add selected groups - If you have created device groups in Defender for Endpoint to limit visibility of system to specific teams please ensure that
Cyderes MSS Tier3are assigned users in these groups. Please see this article for further information https://learn.microsoft.com/en-us/microsoft-365/security/defender-endpoint/machine-groups?view=o365-worldwide - Click Save
Entra ID App Registration Setup for Defender for Endpoint SOAR Integration
- Log on to the Azure portal with a user that has Global Administrator, Application Administrator, or Cloud Application Administrator roles.
- Navigate to Entra ID | App registrations | New registration.
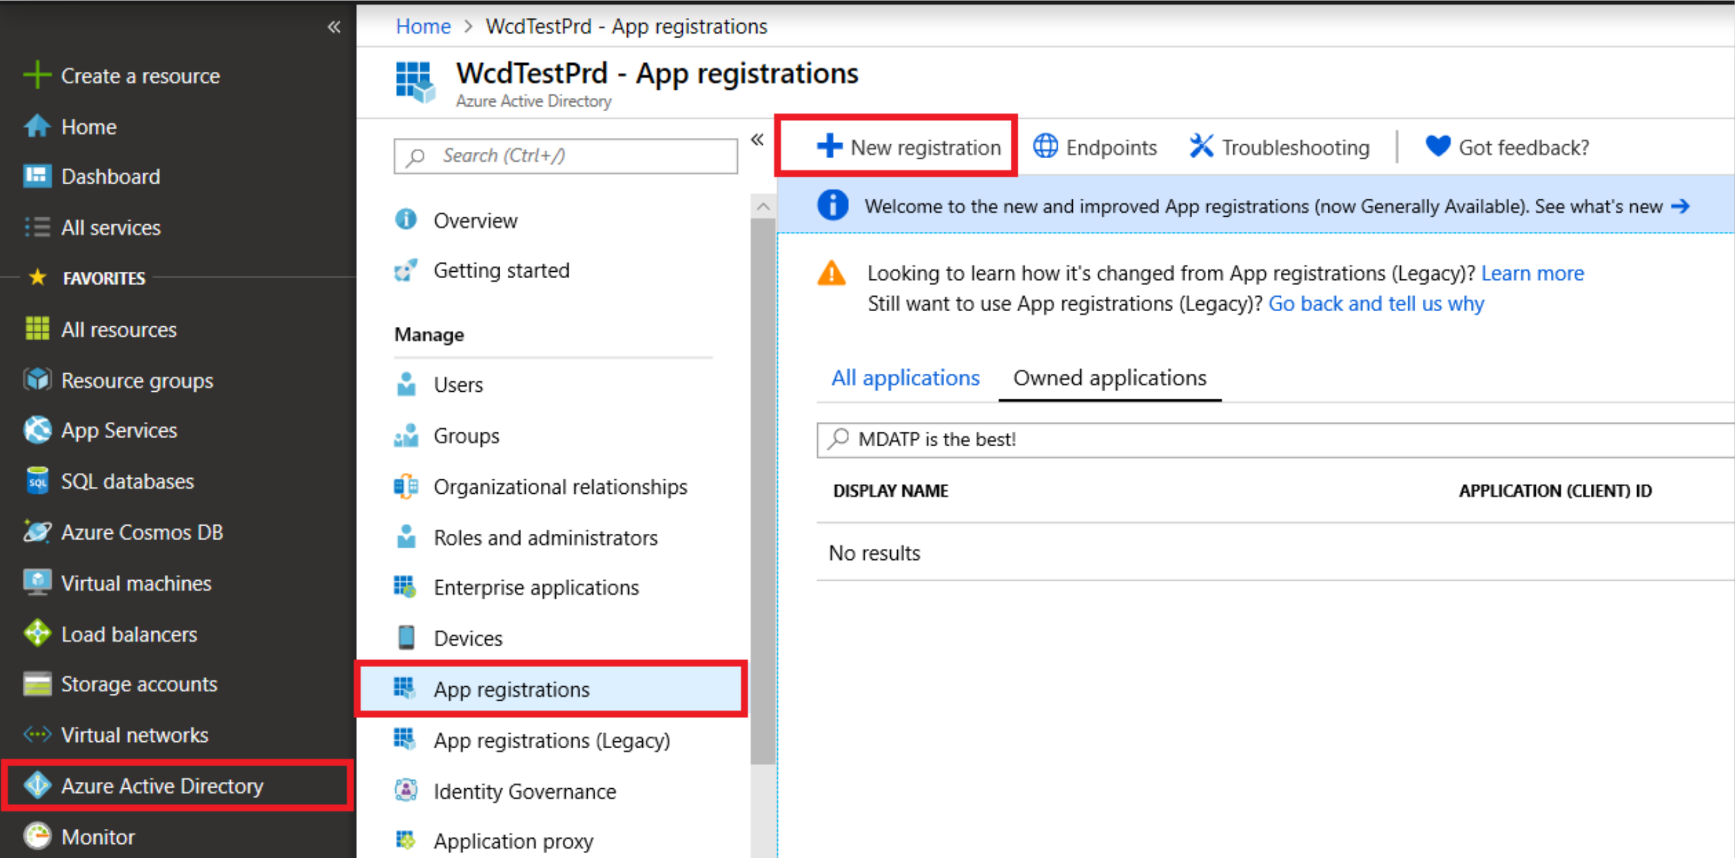
- In the registration form, type “
Cyderes MDE SOAR Integration" and then click Register. - Click API Permissions | Add permission | APIs my organization uses and type "
WindowsDefenderATP" then click on WindowsDefenderATP.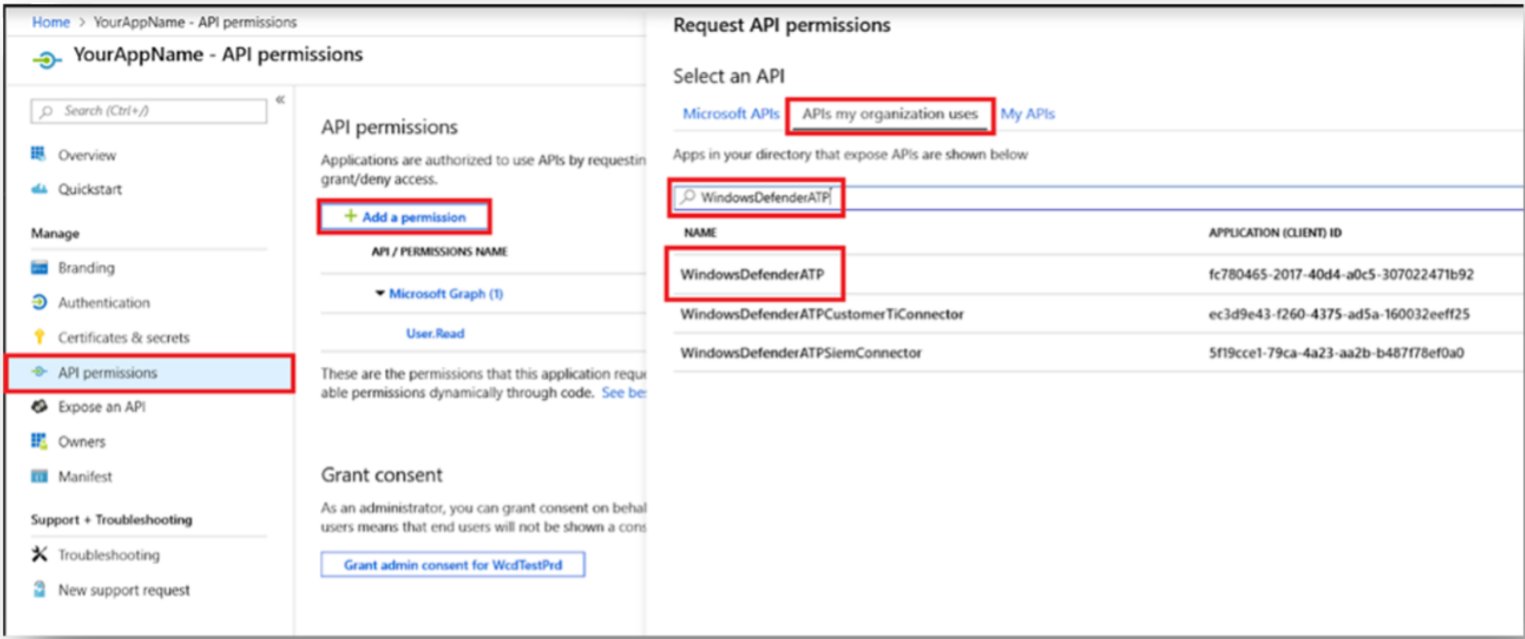
- Select Application Permissions when presented with “
What type of permissions does your application require?" is presented. - Click Expand All and select the following permissions:
- Software.Read.All
- SecurityBaselinesAssessment.Read.All
- Score.Read.All
- Vulnerability.Read.All
- RemediationTasks.Read.All
- SecurityRecommendation.Read.All
- Ti.Read.All
- Machine.Read.All
- AdvancedQuery.Read.All
- Alert.Read.All
- Alert.ReadWrite.All
- Event.Write
- Machine.Isolate
- Machine.ReadWrite.All
- Machine.Scan
- Machine.StopAndQuarantine
- Ti.ReadWrite
- File.Read.All
- Ip.Read.All
- Url.Read.All
- User.Read.All
- Click Add Permissions
- Click API Permissions | Add permission | APIs my organization uses and type "
Microsoft Threat Protection" then click on Microsoft Threat Protection. - Select Application Permissions when presented with “
What type of permissions does your application require?" is presented. - Click Expand All and select the following permissions:
- Incident.Read.All
- Incident.ReadWrite.All
- Click Add Permissions
- Click API Permissions | Add permission | APIs my organization uses and type "
Microsoft Graph" then click on Microsoft Graph. - Select Application Permissions when presented with “
What type of permissions does your application require?” is presented. - Click Expand All and select the following permissions:
- SecurityAlert.Read.All
- SecurityAlert.ReadWrite.All
- SecurityIncident.Read.All
- SecurityIncident.ReadWrite.All
- Click Add Permissions
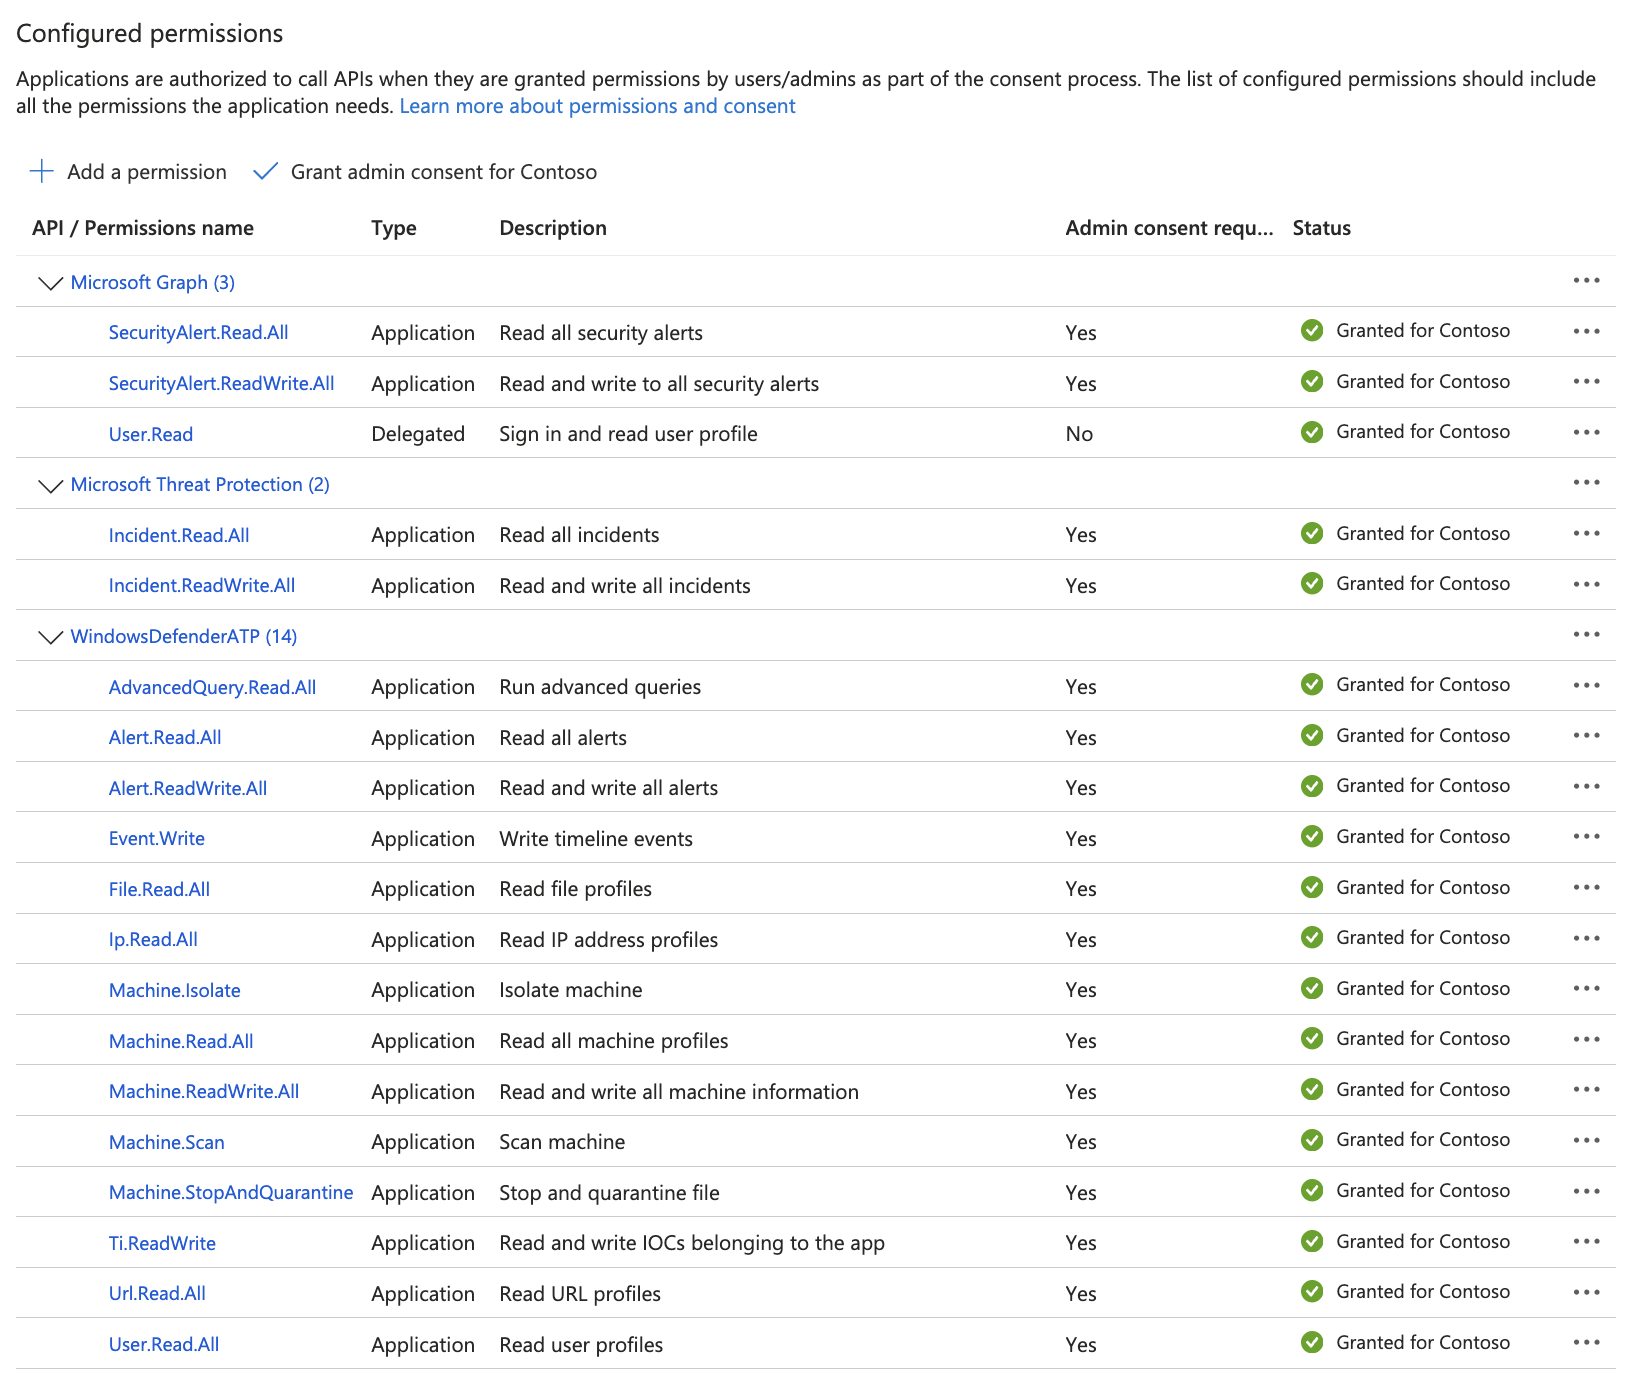
- Click Grant admin consent for <tenant name> and accept the following prompt.
- When finished, the permissions should look like this:
- Click Certificates & secrets, then click + New client secret.
- Type “
Cyderes MDE SOAR Integration Secret" in the description. - Select 24 Months for the expiration duration.
- Type “
- After clicking Add, save the secret value in a safe place. You will not be able to retrieve the value after you leave the page.
- On your application page, go to Overview.
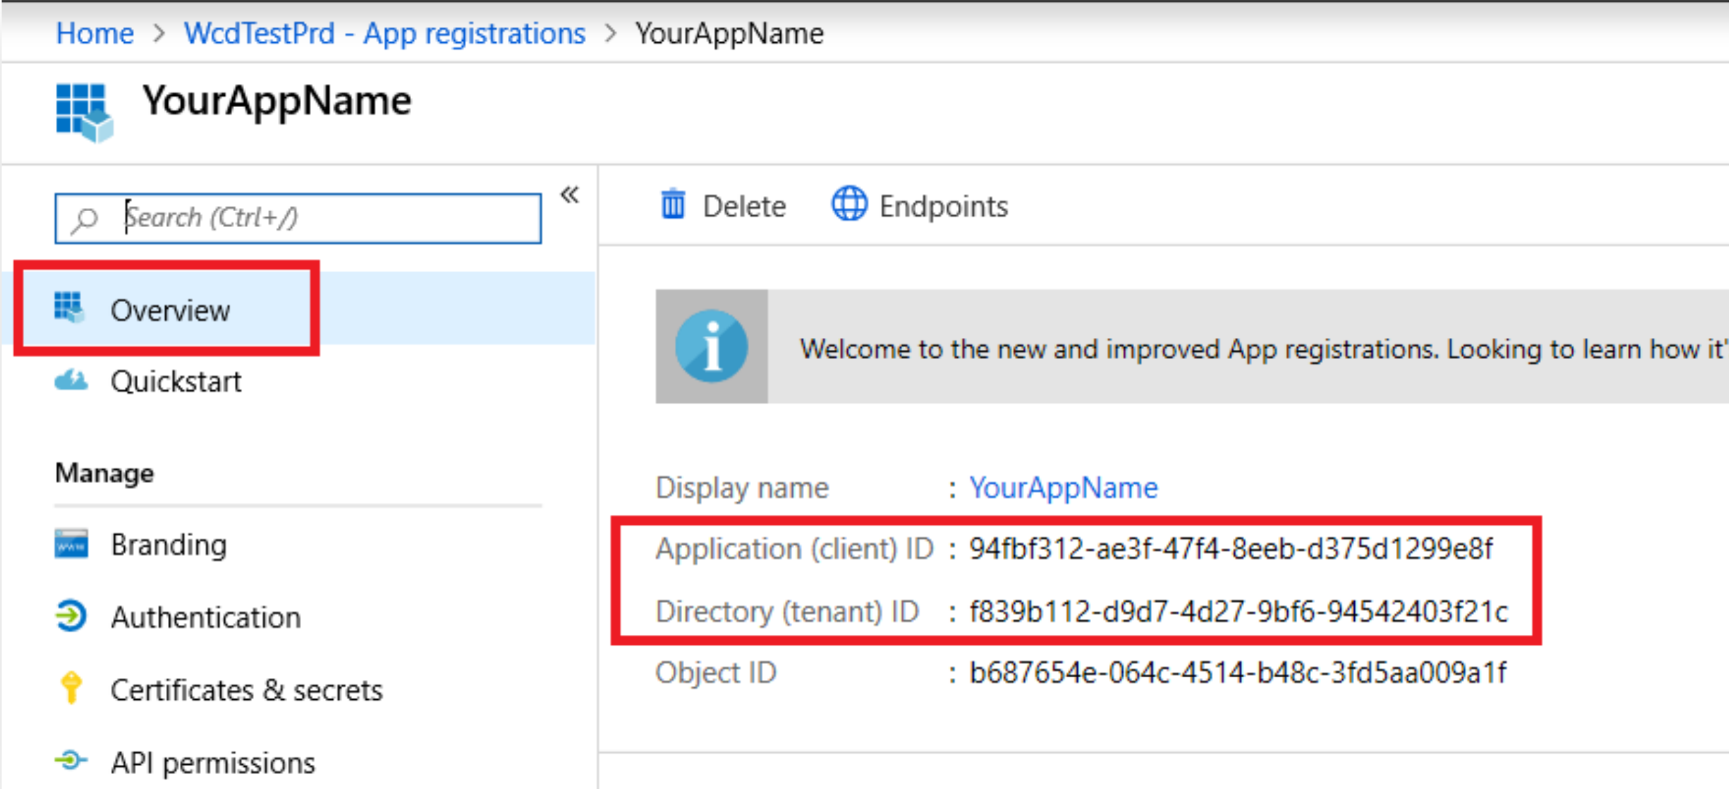
- Please provide the following to the Cyderes Managed Endpoint team using a secure method such as Secure Email:
- Application (Client) ID
- Directory (tenant) ID
- Object ID
- SecretID
- Secret Value
- Secret Expiry
Entra ID App Registration Setup for Defender for Endpoint Health Check Dashboard
- Log on to the Azure portal with a user that has Global Administrator, Application Administrator, or Cloud Application Administrator roles.
- Navigate to Entra ID | App registrations | New registration.
- In the registration form, type “
Cyderes MDE Health Reporting Integration" and then click Register. - Click API Permissions | Add permission | APIs my organization uses and type "
WindowsDefenderATP" then click on WindowsDefenderATP. - Select Application Permissions when presented with “
What type of permissions does your application require?" is presented. - Click Expand All and select the following permissions:
- Software.Read.All
- SecurityBaselinesAssessment.Read.All
- Score.Read.All
- Vulnerability.Read.All
- RemediationTasks.Read.All
- SecurityRecommendation.Read.All
- Ti.Read.All
- Machine.Read.All
- AdvancedQuery.Read.All
- Alert.Read.All
- File.Read.All
- Ip.Read.All
- Url.Read.All
- User.Read.All
- Click Add Permissions
- Click API Permissions | Add permission | APIs my organization uses and type "
Microsoft Graph", then click on Microsoft Graph. - Select Application Permissions when presented with “
What type of permissions does your application require?". - Click Expand All and select the following permissions:
- SecurityAlert.Read.All
- SecurityIncident.Read.All
- Click Add Permissions.
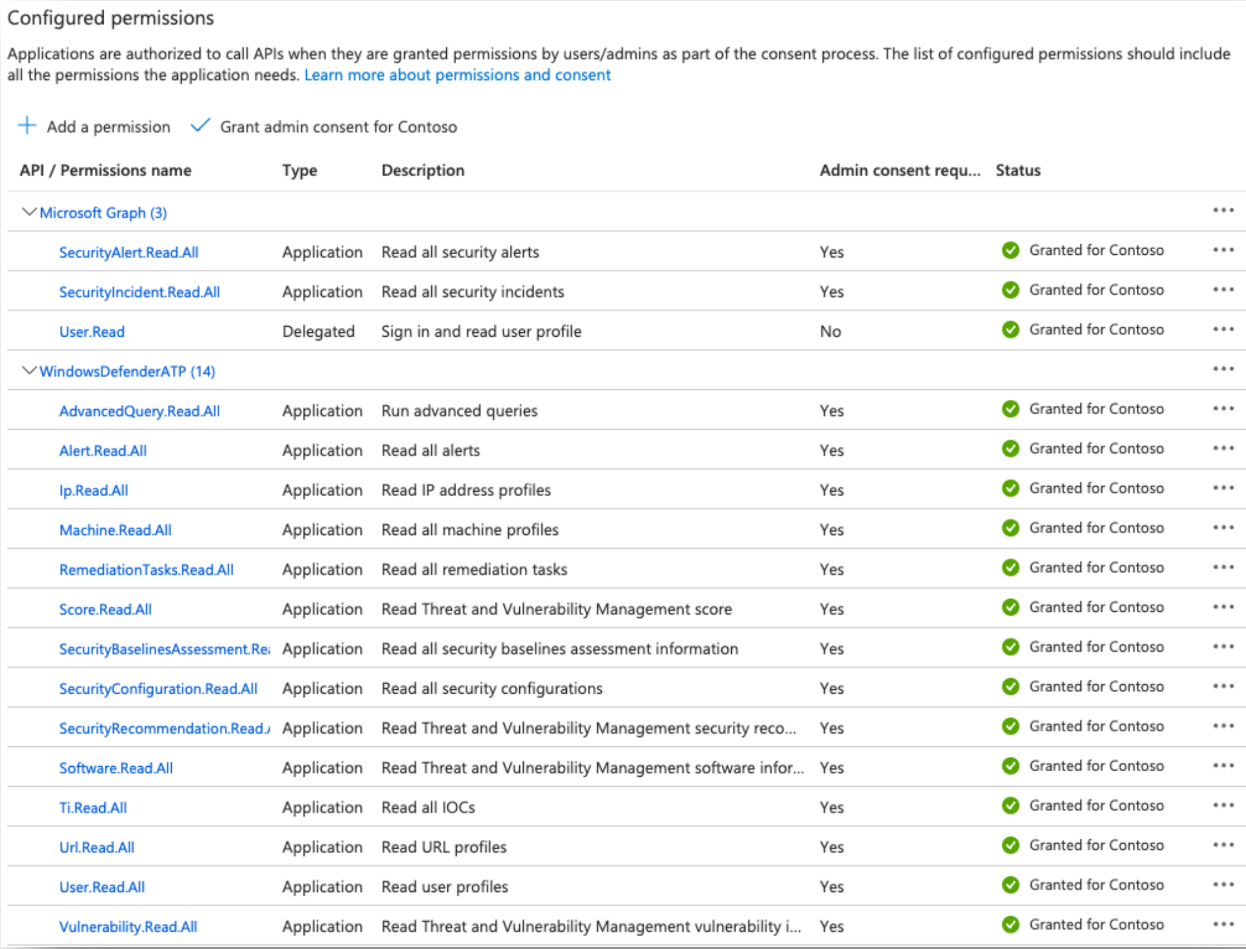
- Click Grant admin consent for <tenant name> and accept the following prompt.
- When finished, the permissions should look like this:
- Click Certificates & secrets, then click + New client secret.
- Type “
Cyderes MDE Health Reporting Secret" in the description. - Select 24 Months for the expiration duration.
- Type “
- After clicking Add, save the secret value in a safe place. You will not be able to retrieve the value after you leave the page.
- On your application page, go to Overview.
- Please provide the following to the Cyderes Managed Endpoint team using a secure method such as Secure Email:
- Application (Client) ID
- Directory (tenant) ID
- Object ID
- SecretID
- Secret Value
- Secret Expiry